Finish dimension planning with do-it-yourself design and install tips
Proudly hand-made in the Midwest for over 30 years. Knit shade panels are the most cost-effective design choice for saving energy while passively controlling indoor air temperature in office buildings, homes, patios and pergolas, livestock shading, wastewater treatment plant settling pond cooling, and hail storm protection. You can expect to see at least eight years of service from one of our properly installed panels and much longer when canopy is cleaned and removed in the winter. Simple exposure to sunlight is not what determines longevity, but rather avoiding abrasion and snagging damage. Laced into place taut on all four sides with soft braided rope is best practice to reduce movement and abrasion for longer life.
When using the quoting and ordering form, reversing Width and Length dimensions can sometimes save money and present different options. For instance: order 23 foot Width by 13 foot Length (not 13' by 23') for less waste and slitting and a different size grommeted pinch pleat. The dimension entered for 'Width' instructs the quoting form what size of stock fabric to cut down from. For instance with a panel 5 foot by 11 foot, you can enter 5 foot width by 11 foot length, instructing us to cut down from 6 foot stock. Or enter 11 foot by 5 foot, instructing us to cut down from 12 foot stock.
order at least 6 inches smaller than interior of framework and lace with rope
Best practice is to order shade panels at least 6 inches smaller than the interior of your framework and then laced in place trampoline-style with 5/16 or 3/8 inch diameter braided rope. This provides about 3 inches of gap on all four sides to tension properly with room for possible variance. The batten tape webbing on our sewn reinforced perimeter hem does not stretch at all. While possible to force a panel to distort and 'pillow' in the middle, it is not necessary, especially when grommeted pinch pleats are installed in the middle to limit distortion and provide engineering support in center of the panel. Knitted fabrics may stretch a little during installation, but they also contract/tighten/shrink a bit too, so there is normally a net-zero change when installed properly under tension. Knit shade material engineering specifications and material MSDS sheet.
Standard boating knots using cleats to terminate rope at every corner will provide the most consistent tension and allows for tightening later. Best practice is adding 1/2 inch diameter galvanized conduit or copper pipe, or aluminum anchor bars alongside or atop the wood framework. Sliding a pipe through the eye screws is possible too. Lacing with rope on a bar will spread the stress out much more evenly than nailing or stapling. Avoid using PVC pipe since it degrades in sunlight and gets brittle. Please note that special grommet (or pinch pleat) placement is not possible to provide. Grommets are punched approximately one foot on center starting near one corner and then punching grommets all four sides in-turn. Grommets on one side of panel are unlikely to align with grommets on the opposite side or from one grommeted pinch pleat to the next GPP.
We do not sell rope given the endless options. Best practice is using 5/16 or 3/8 inch diameter braided rope to support the 1/2 inch diameter #4 grommet holes. Sizing up to 3/8 inch diameter is a nice touch, but a slightly smaller diameter 5/16 inch rope is easier to lace on panels much longer than 20 foot. Do not use bungee cord, shockcord, or any other braided elastic rope which will degrade quickly in direct sunlight. Twine or paracord at 1/4 inch, or smaller, generally does not have adequate 'give' and concentrates wind loading stress on a much smaller portion of the grommet. A soft double-braided marine grade rigging rope is best, but any UV resistant solid-braided rope is adequate when the panel is not being taken down seasonally to protect longevity. Cheap rope has a very 'stiff feel' and tends to kink when lacing, making it more difficult to reuse. Better quality rigging rope has a very fluid feel for easier installation. There is no standardized 'rating' system, but sail rigging, industrial safety, and rock climbing companies generally have the highest quality UV resistant rope. To calculate how much rope you will need, assuming +/- four inch perimeter lacing gap, allow for at least 3 extra inches per foot. For instance: a 20 foot by 20 foot panel is 20 feet x 4 sides = 80 feet x 1.25 = about 100 feet of rope.
best practice is to hang panels underneath, not stretch atop pergola or trellis
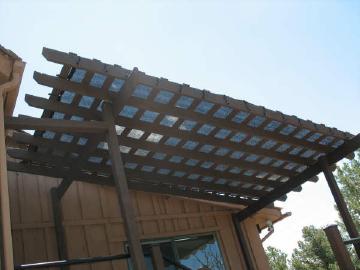
Extend longevity by 'hanging' a panel and lacing it underneath, rather than stretching atop to avoid friction and rubbing damage. Abrasion, from rubbing against the structure, is what eventually degrades a panel over time, not simple exposure to sunlight. Mounting panels atop the trellis or pergola is only preferred engineering when cover is going to be left up all winter in a snowy climate or with flat installations in areas of heavy rainfall. This is the Tan & Black 65% knit installed in a conventional laced with rope design. Note this fabric appears quite different in various light, from a distance, and from different angles. We can mail select knit sunscreen fabric swatches to your attention.
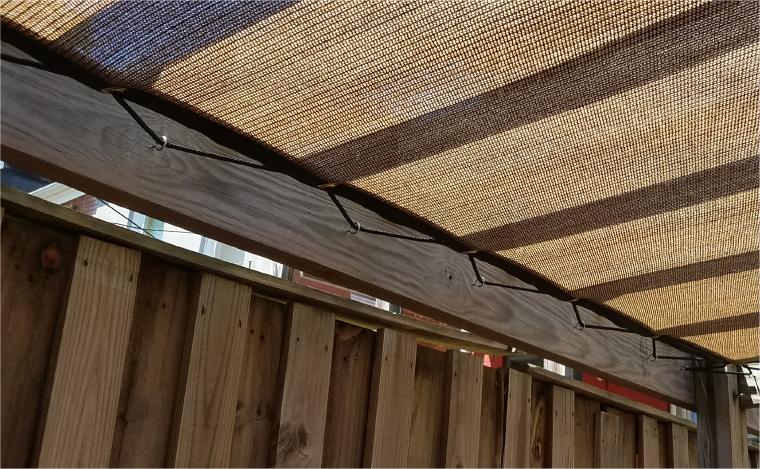
a host of GOOD, BETTER, BEST options... just like any project
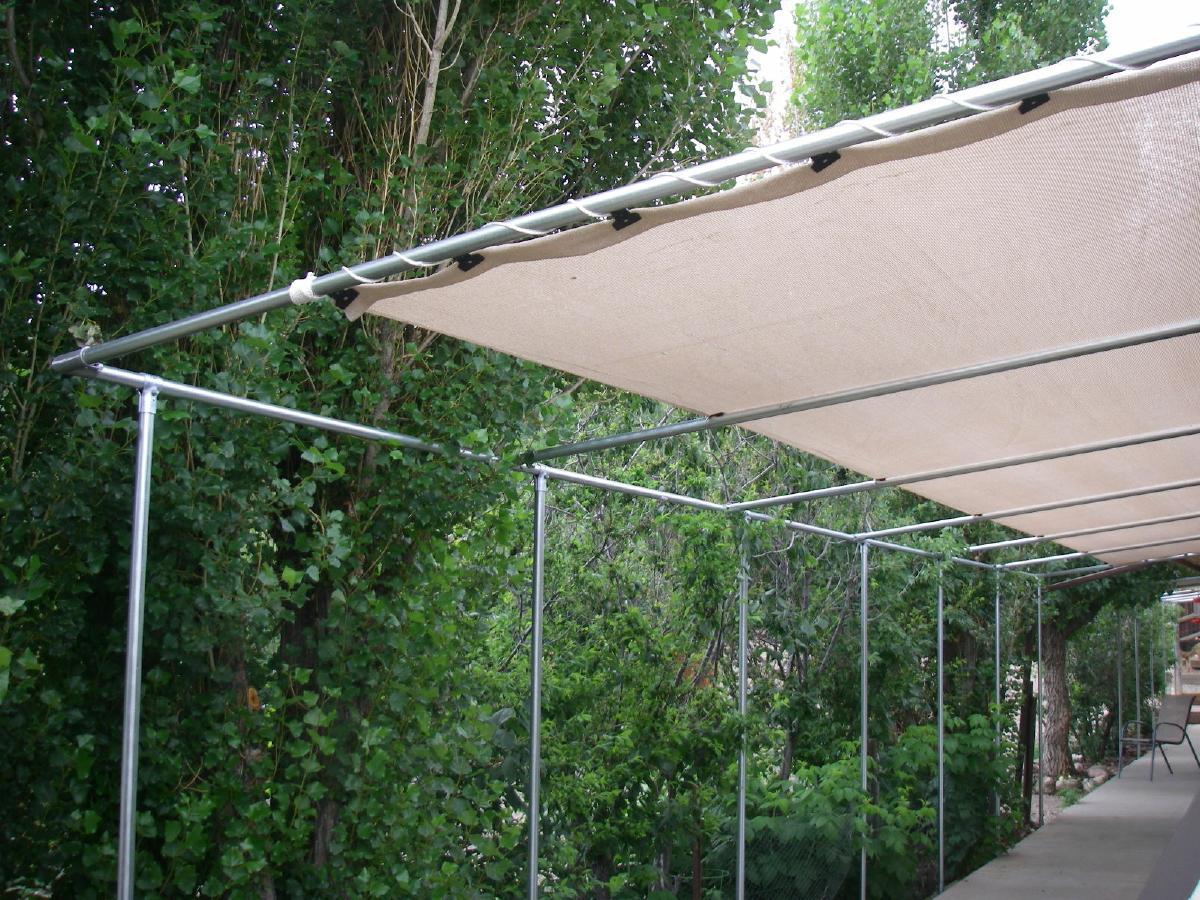
There are more ways to install a shade panel than there are installers, so installation tips are always presented with Good, Better, Best choices. Best installation practice is lacing with rope from each grommet to structure or stainless steel cable. Large 5/16 or 3/8 inch diameter braided poly best displaces "loft and sail wind-load" evenly onto all perimeter grommets. Always lace in a zig-zag 'trampoline-style' pattern using all the grommets. Rope goes through grommet and then around the framework (or fastener in frame or cable) and then back through the next grommet in-line. Never lace a panel such that the rope stretches horizontally between two grommets, since this will cause damage to the un-sewn hem tape surrounding the grommet and void your warranty. Avoid using bungee balls or bungee rope as they degrade in the sunlight too fast and allow the panel to flex too much. Avoid using stiff nylon rope, fine cordage, or wire since they will not flex, like a soft pliable double-braided poly rope. While possible to simply run a stainless steel cable directly through the grommets, lacing with rope from grommets to cable is best practice. Avoid corners-only attachment directly to just the four corners of any shade sail or panel. With grommets every foot around the perimeter, the cable or structure receives all the stress, abrasion, and tension from the rope lacing, while keeping the patio cover taut without abrasion. Galvanized chain link fencing 1-3/8 inch diameter 'top-rail' pipe and fasteners are locally available for an economical do-it-yourself framework. The following installation is is the Green 60% knit laced in place with 3/8 inch diameter braided rope.
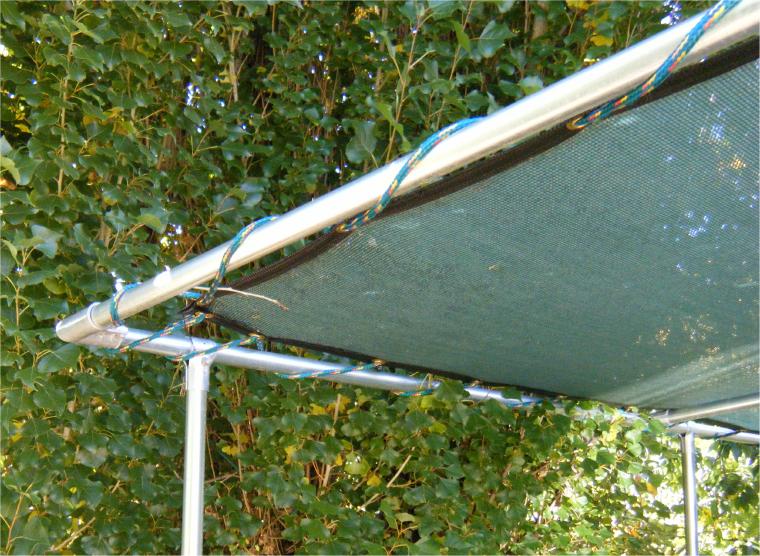
braided steel cable framework, angle iron, or conduit pipe instead of wood
Your perimeter 'framework' can be anything you wish. Contractors often install a cable or pipe frawork above or below existing wood structures to allow lacing without placing fasteners in the wood beams and rafters. Braided galvanized steel cable or copper pipe or galvanized conduit is commonly used. Eye bolts or pipe clamps and turnbuckles at all four corners. Plus, eye bolts supporting cable (or pipe) in the middle of longer spans to eliminate deflection. Curving of the cable (or pipe) when perimeter is laced taut with rope should be avoided. Regardless of cable quality, smaller projects are fine with nearly any 3/16 inch diameter galvanized or stainless steel braided cable. Better cables are rated for higher 'breaking strength' and advertised as commercial quality Aircraft Grade, making making some 1/8 inch diameter cables stronger than a 1/4 inch cable. If you invest in stainless steel braided cable, Type 316 stainless steel has a greater corrosion resistance than Type 302/304. Do not use vinyl coated galvanized steel cables. Vinyl cable coatings turn yellow and crack, needing replaced long before the cable ever fails. Install cables with lots of quick-link thread connectors to allow for easier disassembly should you wish to drop panel seasonally, for extreme weather, or to perform maintenance on the framework.
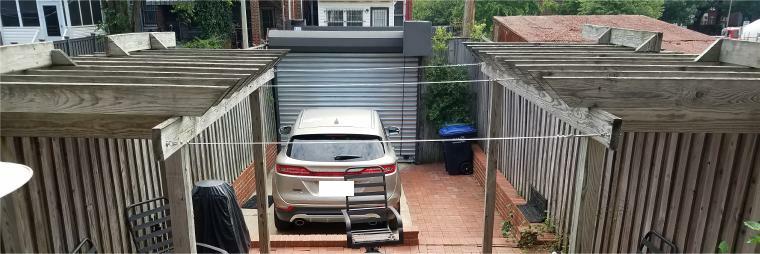
grommeted pinch pleats can be added to the center of any panel
This is the Tan & Black 65% knit fabric, as shown in first image on this page, before and after panel installation. Note the braided steel cables on both ends and in the middle to support the center grommeted pinch pleat. Fabric will appear quite different in various light, from a distance, and from different angles.
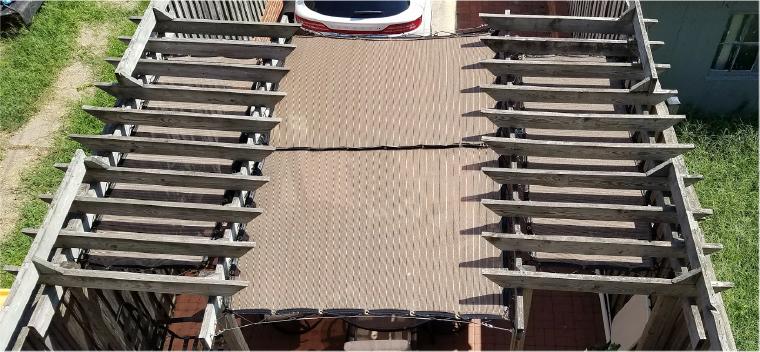
Grommeted pinch pleats are recommended for any size panel to provide much stonger engineering and installation stability. For best longevity, always keep the center from lofting and sailing in the wind, stressing grommets and rubbing fabric against the pergola. All knit shade panels over 12 foot wide from us will have a length-wise GPP installed atop the loom splice found on 20, 26, and 32 foot wide stock since larger widths are created on dual looms. This is the Tan & Black 65% knit once again on the same framework, showing the reverse side of fabric with a more consistently beige appearance.
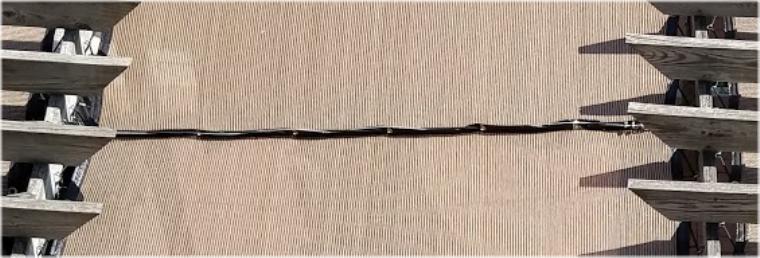
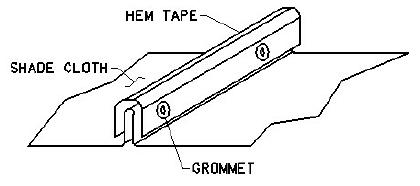
Grommeted pinch pleats are identical to the perimeter sewn hem, except installed across the middle (width) or down the center (length). This folded, reinforced support pleat with brass grommets every foot provides extraordinary engineering strength and stability, increasing longevity. Even when not supported by braided steel cable or laced to pipe, conduit, or framework, GPP will calm panels in the wind, preventing 'loft and sail' stress and abrasion rubbing damage. This is the Green 60% knit as seen from above.

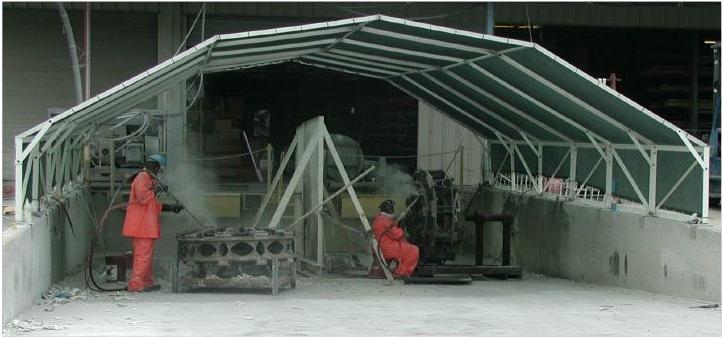
Angle iron bracing is often used for gambrel truss roof shape bolt-together shade structures and hail storm protection covers. Green 60% knit shown here allows more ambient light through for work area safety while cutting a very noticable amount of the heat. Black 80% knit is by far the most common choice for optimal shading and cooling potential, but a lighter, more translucent fabric is often called for on commercial projects where more ambient natural light underneath is desired.
fabric installed without any perimeter hem and grommet work
Same 1-3/8" galvanized 'top-rail' fence pipe awning, but covered in plain cloth without any hem and grommet work. Cut ends are folded over several times and anchored with plastic locking clips. Best practice engineering here is to add stainless steel cable running lengthwise and fabric attached one foot on center with locking clips.
Year-round installations on wooden trellis, lanai, or pergola can be made with 'raw material' plain cloth stretched atop (or underneath) and held in place with 1by2 wood strips (batten boards) around the edges and interior, sandwiching the plain cloth between the wood trellis and outer trim wood batten board. Common practice is to roll batten boards into fabric, not just sandwich between batten and framework on the perimeter. This rolling of fabric onto perimeter batten board allows stretching and firm, even fastening without stressing and tearing. Start with two opposing sides, rolling batten boards that are at least a foot smaller than the fabric. Then roll the other two opposing sides with a batten board that is the same size as remaining fabric. This allows you to install without cutting the fabric at corners and leaves no cut edges exposed.
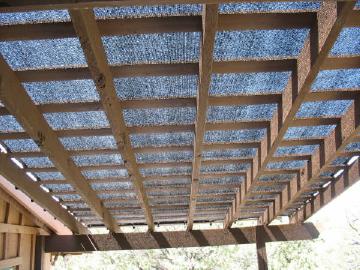
Use nails, not screws, to avoid snagging fabric. Pre-drill batten boards and use large fender washers to evenly spread-out stress over the full width and make nails easier to remove without damaging the lumber. Best to use galvanized nails, if not aluminum or stainless steel, to avoid rusting and eventually abrading the fabric. On panels more than 12 foot wide, an optional center grommeted pinch pleat is normally installed on the panel to protect the loom splice found on larger width material. Professional shade cover installers invariably begin large panel installations by lacing the center grommeted pinch pleat to central framing member (ridge beam, cable, conduit) and then pulling taut across width sides and finally tensioning across length, towards two ends in-turn. This is our Black 80% knit which is the most common choice.
Roman shade or drape is possible when panel must move back-and-forth
We suggest using 5/16 inch quick link fasteners to connect from panel edge grommets onto 1/4 to 5/16 inch diameter braided stainless steel cables along the sides. Vertically hung moveable panels normally are installed as 'drapes' with stainless steel cable running through the grommets and pulled from side-to-side. Or drapery rings can be installed, much like a shower curtain, and panel (drape) pulled back-and-forth along a pipe or curtain rod. Grommets approximately every foot on center is standard for our panels, making this design possible. Grommeted pinch pleats are not installed much closer than six foot on center, which is optimal for fixed-in-place, laced taut shade panel installations. Mobile, horizontal Roman shades deployed overhead, with GPP on very close centers, can present aesthetic issues for some clients. As viewed from underneath rather than looking down at the pinch pleats and grommets, GPP placed close together may appear to waver a bit. Plus, we do not offer special grommet placement to ensure cable slides accurately through all pinch pleats in-turn. Such Roman shade grommets would have to be installed by client. Note pinch pleats can be added after production on a home sewing machine. Panel is ordered 2-3 inches longer than finish length deployed, per pinch pleat installed. For instance: five pinch pleats would require at least 12 inches additional length for starting panel, depending upon sewing method. Sewing without hem tape webbing on a home sewing machine provides better presentation when pinch pleats are installed in close proximity. Mobile, horizontal Roman shades deployed overhead, standard and best practice is to run several stainless steel cables underneath a single panel and then pull it back and forth, like an overhead 'drape'. Single panel rests atop cables (or rope or pipe) and is pulled back and forth. Pinch pleats are not necessary with horizontal 'drape' installations less than about 12 foot long. Longer panels benefit from GPP every five or six foot on center to allow lacing to pipe or rod support, which helps keep panel from bunching oddly, as it drapes closed.
we don't sell roll-up mechanisms, but here's Tried and True DIY project plans
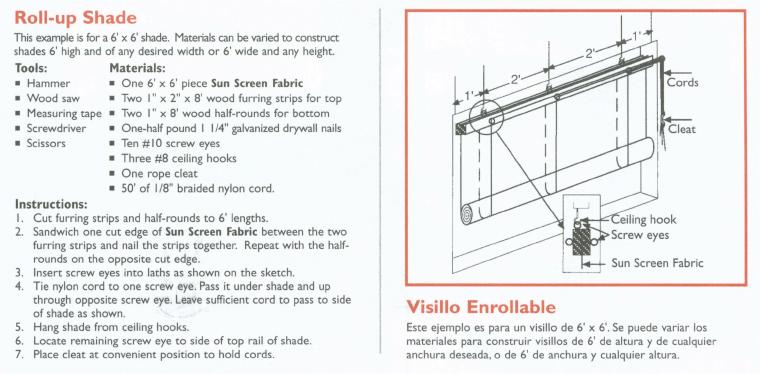
Drapes are easier to construct. Running cable through grommets on the 'top' edge allows pulling to one side, like a shower curtain. Roll-up shades are normally limited to six foot, eight, ten, or twelve foot stock roll widths to take advantage of the factory-bound edge. Cut, exposed side edges (odd widths) must be hemmed or at least folded and sewn on a home sewing machine to avoid distortion and curling. Shades wider than about ten foot may require two people to roll up properly, with one at each end, pulling on separate cords. Normally, the bottom edge is grommeted (in addition to top) and a heavy galvanized pipe is laced with rope to the bottom grommets. This allows roll-up to hang taut and reduce wind movement.
When lashing to side posts is required, panels are normally purchased at least four inches smaller than the opening and laced taut with rope. Should you wish install 'snaps' (instead of grommets and lacing) note commercial installers traditionally rivet their post snap receivers onto an aluminum bar. You don't screw individual snap receivers into a wood post. For better accuracy, less individual fastener stress, and ultimate freedom of placement, rivet your snap receivers onto an aluminum bar. Makes it possible to come back later and adjust panel tension.
Tan 65% knit shade panels with 3 inch pockets top and bottom
black color knits versus white, tan or green in terms of dropping temperature
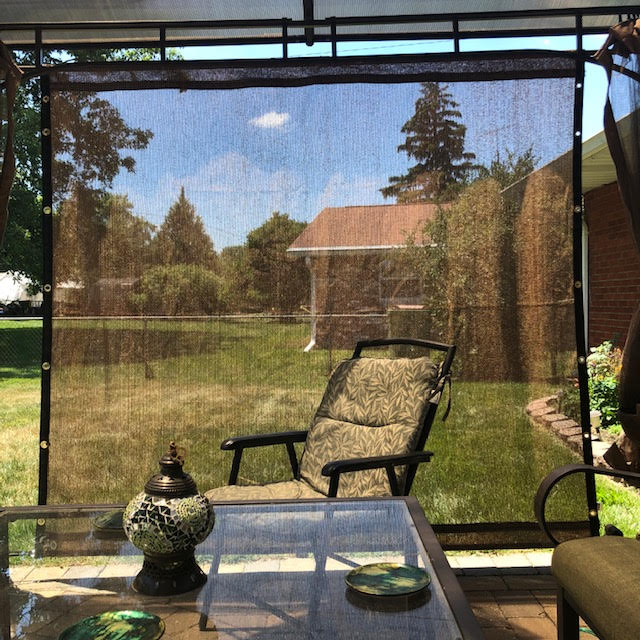
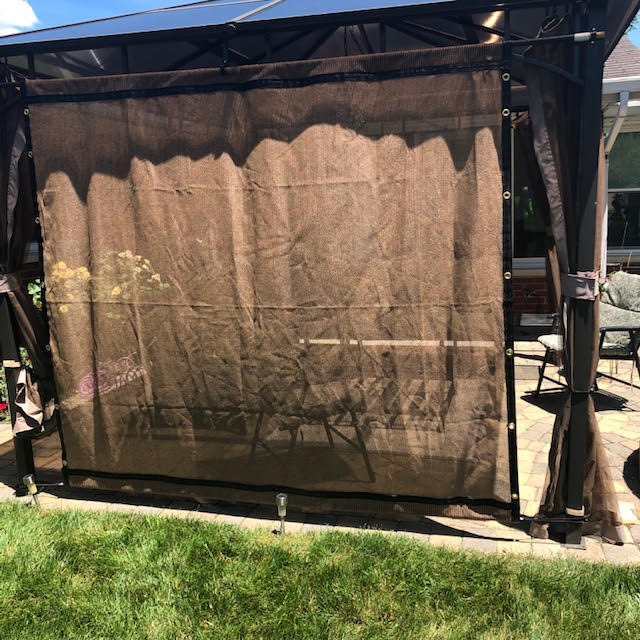
Hot climate patios almost always install 80% or 90% density and usually in black color to best drop the temperature (and sunlight) underneath. You still get plenty of ambient natural light in from the sides, so it is not too dark. The only reason to install 70% or lower knit density is to ensure ample heat gain in the spring and fall months, where blocking 80% might make the patio a little too cool. It is common to have two shade panels in a hot climate: one high-density for peak summer months and one lower-density for when it cools in the fall. Functionally, black is the preferred color for a patio (see message box above). Patios are a place of relaxation and the black color absorbs more ambient light (not reflecting it), dilating your pupils, and generally creating a much calmer atmosphere. Heated air readily passes through any knit density, so the question of black absorbing more heat and radiating it back onto you is largely irrelevant to your personal comfort level underneath. Excess ambient light bouncing off a white panel adds heat gain and makes it much more of an active area, rather than a relaxation spot. The Black 70%, White 50% and Green 60% shade materials are very nearly the same knit pattern. The darker black absorbs more light, allowing only 30 percent to pass through. Green 60% knit is a compromise between blocking heat gain while still allowing 40% sunlight to pass through for plant growth and is very popular with greenhouse growers. White 50% knit is an excellent agricultural product too, reflecting maximum ambient light underneath, while allowing only 50% of direct sunlight to pass through from above. Any of the materials can be ordered as a double layer panel, where fabric is folded over for a heavy-duty two-layer panel with much more sun blockage and strength than a single layer shade tarp.
solid tarps and a myth about shade factor, knit density, and sun blockage
Shade factor is a measurement rating of knit density with the percentage noted being the amount of sun blockage. A 50% shade factor White blocks 50% of direct sunlight - a 60% Green blocks 60% sunlight - a 70% Black density blocks 70%. Lower percentage white shade material DOES NOT have the same cooling effect as a higher density green or black. Lighter colors reflect more ambient light underneath (make a patio brighter) while darker colors absorb rather than reflect light/heat, but the material is too light weight (low thermal mass) to RETAIN excess heat/energy. At less than 1/2 ounce per square foot, there is not enough thermal mass to store a large amount of radiant heat/energy. Heat is quickly dissipated by cooler air moving back up through the open netting (even 90% density has ~1.5mm holes).
We do not sell any solid, waterproof tarpaulin 'tent covers' since they are not as effective at keeping a patio or pergola cool. Without holes in the fabric, like our knitted shade cloth, heated air cannot pass back up through. Trapping heat underneath like a tent and allowing rainwater to puddle atop greatly decreases longevity. A knitted shade panel will dramatically slow rain down, but even when installed taut on a steep slope over 45 degrees, not all of the rainwater is going to run off the sides. Given the relatively short life expectancy of solid waterproof poly tarps that allow rainwater to puddle, we recommend roofing the pergola or trellis instead when you require the covering to be 'waterproof'. Metal and Lexan roofing panels are lightweight, economical, and much longer-lasting than tarpaulin, but they can be insanely noisy in a rainstorm. Canvas tent tarps are expensive, dirty, and a pain to keep oiled. And 'heavy-duty waterproof poly tarpaulin' are lucky to last a year in direct sunlight with cheap heat-seamed joints and edges, not fully sewn hems like our knit shade panels. Beware of tarpaulin UV and fire resistant coatings which are invariably toxic and constantly flake off as the tarp ages.
privacy and preserving the view while blocking sunlight and dissipating heat
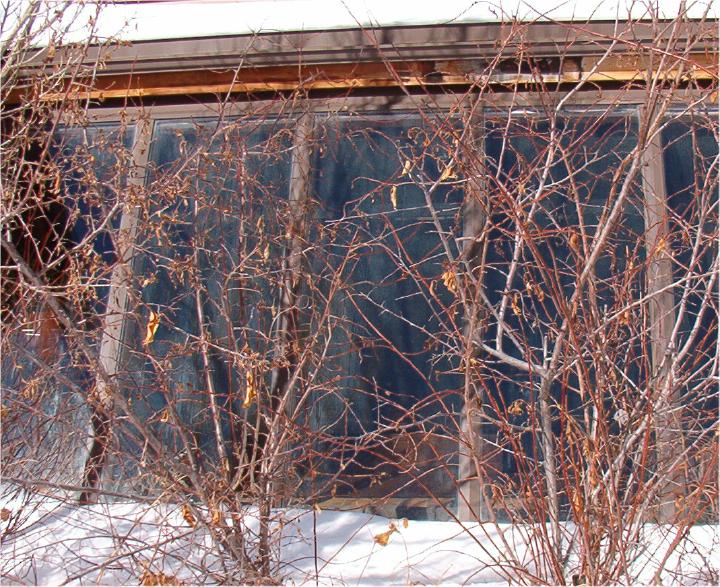
Indoor vertically hung Black 70% knit 'drapes' provide privacy while preserving view. From outside, your privacy can be nearly complete as viewed from an angle or at a distance. Avoid back-lighting yourself by placing room lighting up front, near the windows, not behind you, for best privacy. At 80% density and above, viewing from inside to outside is dimished. Up close, you can see through any density/color of shade cloth, but as you move farther away (20 plus feet) and at an angle, it becomes much more difficult to see objects on the other side clearly. The image below is looking out through our Black 70% knit. Mind you, the intense sunny day lighting and super-white snow foreground exaggerates the clarity, but this 70% black knit is a good compromise between preserving the view from inside and creating a sense of privacy from outside.
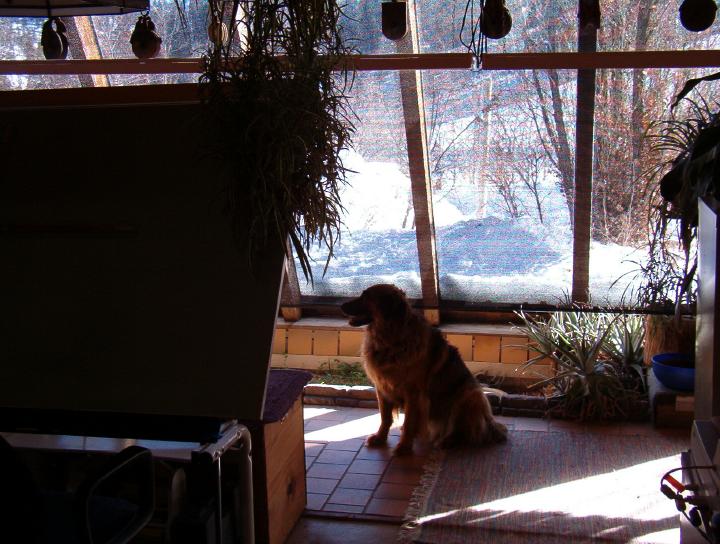
Looking in from across the yard, about 20 feet away, the view is very nearly opaque. Refraction off glass is part of the effect, but the key is lack of back-lighting. At night with a light behind you (back lit), the shade material would naturally provide less privacy. Direct natural light can overpower, washing interior rooms with glare on a sunny winter day. Knitted shade material drapes, sheer or curtain are an easy way to control the indoor environment passively. The shade netting catches a large percentage of direct solar gain, dissipating and stratifying it for best radiant effect. Heat tends to concentrate around the sunscreen fabric, providing very effective cooling for interior of the home.
Free air conditioning with passive solar cooling!
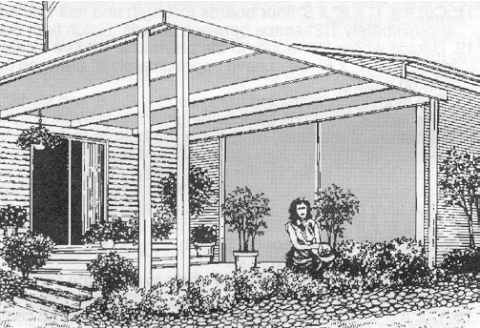
Create much cooler micro-climates along south facing windows and exterior walls to dramatically cut cooling load. Shading the south side of your home or patio door entrance stops radiant heat gain from direct sunlight, greatly lowering your air conditioning bill. Installing a knit shade panel patio trellis cover is the most cost-effective passive solar building projects you can work into any building design, regardless of the style of architecture.
we don't sell shade structures, only manufacture custom size shade panels
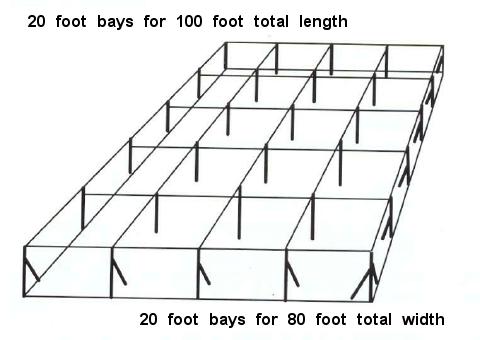
Fence pipe frames are cheaper and much more stable than a wobbly pre-packaged frame kit. Larger shade panels are typically installed over trellis frames, utilizing multiple 'bays' to lend even more support to the shade netting when spanning greater widths and lengths. The standard specification is for a series of ten, twelve, or twenty foot wide panels versus a single large one. Weight of the material is not an engineering issue (less than 1/2 ounce per square foot), but sail effect can be great in a heavy wind. The material will handle the wind fine... the structure needs to be solid and secure, though. The additional lacing offered by a series of smaller width panels and grommeted pinch pleats) creates a much stronger structure and keeps the panels from lofting and sailing in the wind. Depending upon bay/stall size (span of pipe), 2" to 4" diameter heavy-gauge galvanized pipe/posts are commonly specified by engineers and the inside of pipe often filled with concrete and maybe even a stick of rebar. Any local plumbing supply store will have all the fittings and pipe you need and may even be able to cut threads on the straight pipe sections for you. Avoid plastic PVC pipe since it gets brittle very quickly in the sun. Black ABS plastic pipe is better, but ultimately, galvanized metal pipe is always best practice for posts and framework. Always GROUND metal structures and supporting cables on copper spikes (or plates) driven into the ground to deflect lightning strikes. A single copper plate or spike at one corner may be adequate for small frames, but best to drive grounding spikes (or plates) on two opposing corners. Standard lightning protection practice is to run a thicker gauge cable from copper grounding plate or spike up to cable connection clamps at top of post, rather than simply connect spike to post.
larger shade structures are best designed around stock pipe and panel sizes
On larger projects with lots of tension on cables, use 'forged' eye screws and turnbuckles or weld the anchor eyelets closed so they cannot bend open. Stress on anchor points can bend open eyelets on poorly-made turnbuckles and eye screws and bolts. When stringing cable between posts, avoid using wood. Iron pipe at least Sch40, if not Sch80, in at least 4 inch diameter and bed base of pipe at least 1/3 of total length in concrete. Do not use PVC plastic pipe since it degrades in sunlight and gets brittle. Knit shade fabric weighs less than half an ounce per square foot, so weight is not the issue, but rather loft and sail forces in the wind. Avoid excessively stressing panel corners for best longevity. We do not provide any engineering services or local referrals, but have posted knit fabric engineering specifications and fabric MSDS sheet.
Pragmatically, you design the structure to fit readily available stock fabric widths. Structure framework is generally made from stock 10 and 20 foot lengths of threaded galvanized pipe. Engineers generally specify more than one panel and design around the standard stock fabric widths of 6, 8, 10, 12, 20, 26 and 32 foot stock widths. Order in a stock width and no slitting of fabric is involved in production and panels are much easier to replicate consistently. Rather than a single very large shade panel, clients normally order several smaller panels. Then if a section is damaged, you only have to replace a portion of the whole shade structure. While a hip roof may be aesthetically pleasing, it dramatically increases construction, installation and removal time. Best practice is to design a flat roof. Water will percolate through fabric, so a steep pitch is not necessary when the panel is securely fastened underneath with multiple grommeted pinch pleats. Professional installers invariably begin large panel installation by lacing the center grommeted pinch pleat to central frame member (ridge beam, cable, conduit, pipe) and then pulling taut across width sides and finally tensioning across length, towards two ends in-turn.
While possible to design large outdoor event covers and wedding shade tents with fewer interior and perimeter posts, it requires much larger posts and better rated cable. Average engineering uses 4 inch diameter Sch80 galvanized pipe for posts. Structures should be capped and lightning grounded on all corners (at least) with copper wire and deep-set spikes. Steel post in concrete base is not adequate grounding. Posts should be anchored with at least 1/3 of overall length below ground. Randomly welded perpendicular rebar is best practice to anchor pipe in concrete post hole.
fire resistant shade fabrics are not sold here - beware of these products
Be well aware of what is (not) being advertised with 'fire resistant' shade fabric. Read the fine print. Exposure to direct sunlight usually limits fire-resistant performance to only a few months. Research the laundry list of chemicals being used in manufacture and you will not want to be sitting underneath when those fire-resistant coatings start flaking off. Safety and health regulations are very loose for 'outdoor' versus 'indoor' fabrics. Poly knit fabrics are not fire-rated but they tend to simply melt (not burn) while fire-resistant materials generally resist high temperatures until they finally burst into flame.
Locking clip fasteners attach fabric on cable, fence, rope or nails
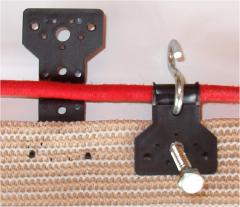
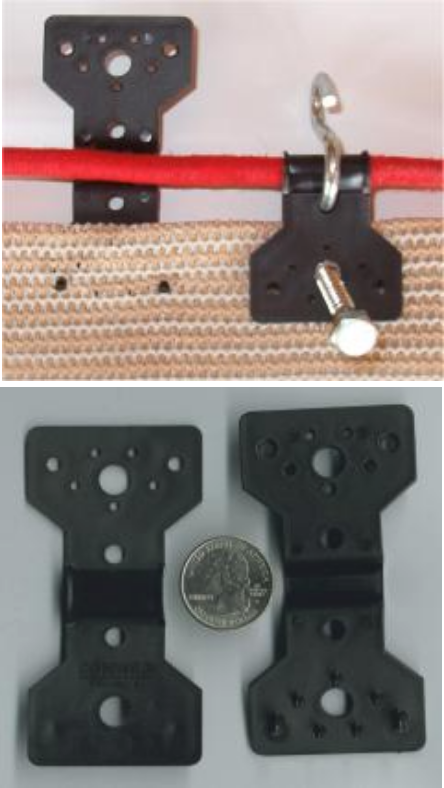
We do not sell grommet kits or nailing plates, since these locking clip fasteners are so much more effective and long lasting on plain cloth panels. Our commercial grade locking clips are heavy duty with longer barbs than 'residential grade' locking clips found in big box stores. Our heavy-duty UV stabilized plastic locking clips are 1-1/2" wide by 1" tall and will easily penetrate at least two or three layers of thick material for a nice strong folded hem. With sewn reinforced hems, a scratch awl is best used to punch starter holes for the main barbs. Specifically designed for tying guy wires off or wrapping the fabric onto chain link fence, cable, or rope (up to 5/16 inch diameter). Large surface area ensures your material will not be damaged when pulled taut. They have TWO front holes for maximum versatility, a small 3/16" hole at top for hook (pictured) or screws and a larger 5/16" hole in middle for lag bolt (pictured). The pass-through opening across top/center will hold up to 5/16" diameter cable or rope (red rope pictured). Top image is a clip being installed, showing several options. Note we do not supply the S hooks, lag bolts, or rope pictured. Bottom image is front and back of a locking clip. You can even put one on each side of fabric, instead of folding over the edge, for a center-mounted fastening point in the middle of a panel. Fold cut edge of material over two or three times and and snap clip into place. Barbs on one side lock into holes on the other side of fastener. These clips are very effective on chain link fences to stop movement in the wind.
36 count bags* of our UV stabilized poly locking clips
$15 per 36 count bag (41.6 cents each) up to 3 bags
$13 per bag (36.1 cents each) at 4 bags (144 clips)
$11 per bag (30.5 cents each) at 7 bags (252 clips)
$10 per bag (27.8 cents each) at 10 bags (360 clips)
$8 per bag (22.2 cents each) at 30 bags (1080+ clips)
Bulk discount pricing will display in shopping cart
* Orders for more than 108 clips will ship loose in box
Email us for 3600 bulk boxes at $720 (20 cents each)
FREE Shipping with service to 48 contiguous states
1 bag First Class, 2-4 bags Priority Mail & 5+ bags UPS
Always in stock, shipping promptly by next business day
Fasteners, fabric, and red rope are not included with clips
S hook, lag bolt, red rope, and fabric are for reference only
Two front holes: 3/16" top (hook) and 5/16" middle (lag bolt)
Pass-through across top (red rope) 5/16" cable or 3/8" rope
locking clips are perfect for vertical snow, dust and wind screens or privacy fencing
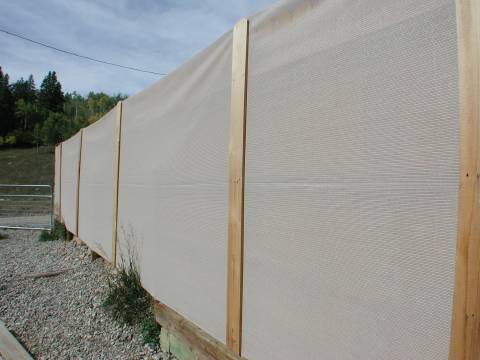
Locking clips can be installed on plain cloth instead of customizing panel with hem and grommet. Braided steel cable can be run top and bottom or locking clips screwed directly to wood fence. Knit shade panel open weave allows air to pass through, while providing privacy. Total privacy is not possible when someone has their face pressed against the fabric, but as they move farther away (20 plus feet) and at an angle, it becomes increasingly difficult to distinguish objects on the other side. All colors resist fading very well and normally last over ten years in vertical applications. Key to longevity is avoiding abrasion damage from movement in the wind.
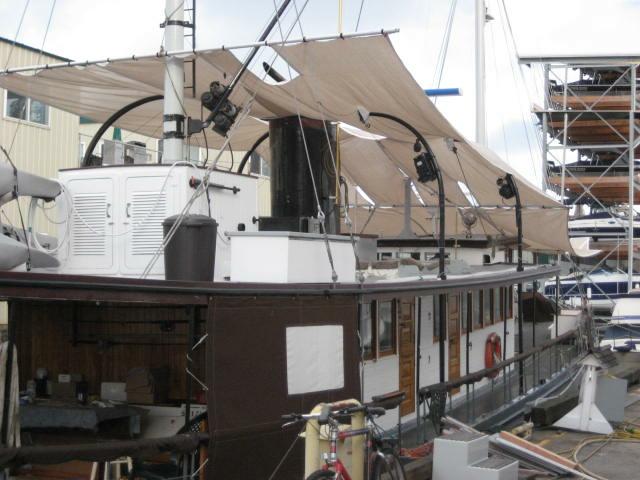
Six foot wide knit shade material used as free-form shade panels, hung individually atop a yacht. By fastening only the ends, installation is weaker and there is more movement, but panels can be easily removed when the wind picks up. Note locking clips are best placed one every foot on center, not two foot centers, as shown. We no longer carry the six foot Saddle Tan 70% knit shown in the images above and below here, but there is a Tan & Black 65% and Tan 65% knit available.
Repairing a torn shade panel typically requires sewing
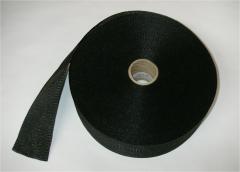
There are not any adhesive 'repair tapes' or patches available that will stand up to sunlight exposure and tensional stress for any length of time. Short small cuts on knit shade covers are best pulled together and chain-stitched by hand with needle and thread. Any local sewing or craft store will stock spools of heavy-duty black #90 UV upholstery thread and #18 chenille hand needles. Knit fabric is not prone to unraveling once properly sewn together, so it's not necessary to melt or sear cut edges. A little silicone or butyl caulk can be applied to better protect the repair, but never present an open flame anywhere near a panel. Longer tears and larger holes are best reinforced with 'hem tape' batten webbing (not adhesive) on a home sewing machine with a #16 or #18 ball-point needle. It might be possible to create a flat sewn 'patch' by laying one piece of webbing on both sides of the panel, but a 'pinch pleat' is much stronger and longer lasting. For a pinch pleat, the fabric is 'pinched' into a creased 'pleat' with solid webbing folded atop and sewn. Always test your sewing machine tension settings on a folded piece of webbing before stitching. We do not sell batten webbing in less than full 300 foot long rolls (see below) but you can search online for: "3 inch wide black polypropylene webbing strap". Note that nylon and polyester webbings do not have the same inherent UV sunlight resistance as polypropylene. Black is a better choice for longevity since it does not contain any added colorants which tend to break down in direct sunlight. Beware of fire retardant coatings.
2-3/4 inch by 300 foot rolls of black hem tape webbing
FREE Shipping contiguous 48 states only - UPS or USPS (1 roll)
HTM Passive Solar eBook – Table of Contents
- introduction to high thermal mass pragmatic design, low-tech functions, and materials
- photo gallery is packed with images, commentary, and our free HTM Home Tour video
- dry stack surface bonding cement construction photos and some block layout sketches
- floor plans features several functional basic layouts and commentary on design choice
- roof detail chapter with T&G plank-style vented roof decking atop log purlin joist beams
- sun screens critical passive solar design component to create favorable micro-climates
- heat storage fiberglass water tanks are a low-tech way to moderate temperature swings
- earth tubing is simple passive technique to temper a household’s fresh air return intake
- solar orientation isn’t critical since HTM designs excel in hot or cold climates anywhere
- exterior fascia SBC coatings over EPS foam board insulation and sloped glazing details
- wing insulation and shallow footer, frost-protected perimeter foundation design choices
- planter beds are a central, functional component of greenhouse-style HTM construction
- links page is filled with a helpful selection of research references and relevant websites
Last updated on February 22nd, 2024

